Written by Bryle Molina.
It’s that time of the year where we’re all cramming in our study plans in time for exam season, or reading up on those topic readings to get as many academic sources for our last few assessments as we can.
And if you’re like me, who works two jobs on top of studying for my degree, then you would know how overwhelming it is to meet deadlines amongst your schedule.
Would you believe me if I said that there’s a tool to make all of this work?
Introducing… Notion!
Notion is a database builder — the charm of this platform is that you are able to build everything and anything to keep track of all aspects of your life!
To-do lists? Spice it up with coloured tags.
Upcoming Netflix shows you want to watch? There are templates for that.
This platform has especially been useful in organising all of my deadlines, especially in my degree where I have assignments that have multiple sections due on different dates.
Oh and did I mention that you can write your notes easily on the Notion app?
What about the fact that you can access your Notion dashboards remotely from any device?
Let’s get started!
You can start your dashboard two-ways; either through a template or you can start from scratch.
If you’re new to Notion I would recommend browsing through their template gallery.
Let’s start a fresh new dashboard and learn the basics!
The building blocks of a dashboard can be accessed by typing the ‘/’ symbol, which will bring up a dropdown of all the tools you have at your disposal to build your dashboard.
The key to getting the most out of Notion is organising your content through pages.
Let’s begin by typing ‘/page’ and starting a page for each of your subjects:
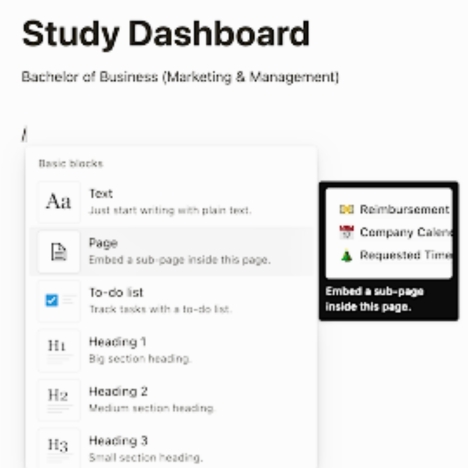
This will then open up a new page… feel free to title this however you want, but for the sake of this, let’s name it one of our course subjects.
You can backtrack through your dashboards via the breadcrumbs on the top left corner of the screen.
From here, your creativity is the limit!
Experiment with all the different building blocks and see what system works for you.
Here’s what my current setup looks like:
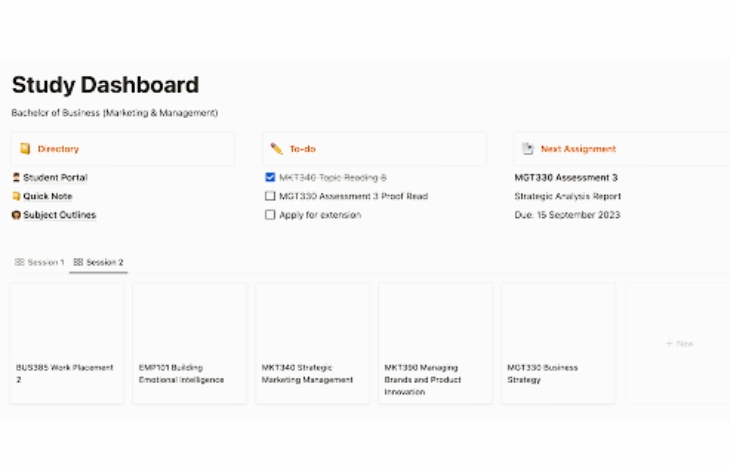
Here we have some key blocks to point out that contribute to my overall productivity:
First is my ‘Directory’ section, where I can jot down important links and URLs for quick and easy access, such as the student portal and my subject outlines.
These are just regular blocks of texts that I have hyperlinked out to an external web page.
Secondly, my to-do list.
I’m a person who likes to jot down every idea I have as I have a tendency to forget them later on — are you the same?
This is where the to-do list comes in handy.
I remember tasks throughout the week so this is an easy way to just get them written down.
I go back later in the week to organise these jobs…but hey at least they’re written down!
Thirdly – this is up to personal preference but I like to have my next major deadline highlighted on the page.
This is especially useful for those individuals who struggle with multitasking and can only focus on one thing at a time.
By highlighting your next priority, you will always see what is coming up next.
Finally, my subjects.
You can set up what is called a ‘database’ so information feeds through different pages.
You update your database in one page, then every other page that also has the same database will update accordingly.
You can learn more about how databases work here.
Next, let’s talk about taking notes on Notion.
The possibilities with this one are endless…and I mean endless.
Let’s start by opening up a new page, and title it accordingly.
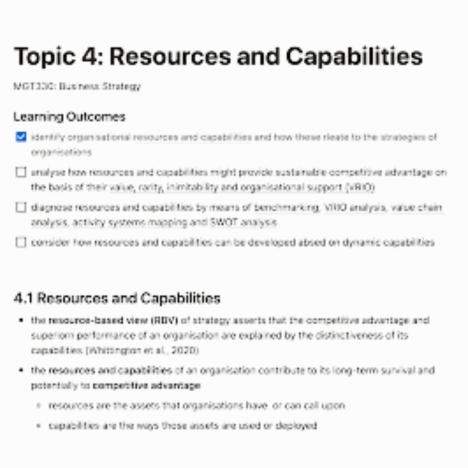
I like to start my notes for a topic by first using the different heading sizes (using ‘/heading’) to differentiate between key headings and sub-headings.
I always begin my notes by writing down the learning outcomes associated with the topic as they are on the Interact2 page.
You can either dot point these, or use a to-do list – the value in using a to-do list is that you are able to cross out each learning outcome once you have written the notes associated with it; this helps with ensuring you cover all the content required.
Next, use another heading and start writing your notes as per the learning outcomes!
I like to use naming conventions for each section of my notes, where I use a numbered system that corresponds to each of the learning outcomes — I like to visually see my progress.
Use dot points to list key concepts and content, and use the ‘tab’ key on the keyboard to integrate sub-notes to further support the statement you are trying to make.
Don’t forget to add your in text references as you go as these will make your life easier when referring back to these when you are doing an assessment!
And that’s it!
They are the basics on how you can use Notion to your advantage to ace your exams and assessments as we draw closer to the end of the Session 2.
Remember that there are many resources that Charles Sturt provides to help students cope with the demands of exams and assessments.
View your exam timetable and other exam requirements here, and jot these down in your newly made Notion dashboard.
Most exams will also be conducted online, where there will be different requirements needed from your end.
Brush up on the requirements by reading up here.
And that’s it!
What you can with Notion is not limited to just your own study.
Try different aspects of your life, may that be your fitness program, or a list of books you want to read in the future.
Most importantly, use Notion to your advantage to always be one (or a few) steps ahead of the game and ace uni!


